We all know the “Top 3” survival priorities, but one thing that seems to be forgotten at times is that there are things that supersede even those three in importance. If someone is holding a gun to your head, you can’t say, “wait while I drink a glass of water.” Likewise, when someone in the family becomes seriously injured, that takes precedence over going out and working in the garden to raise food. For the moment, knowing how to apply proper first-aid is more important than knowing how to grow that food.
Yet from what I’ve seen, few preppers take first-aid seriously. Oh, they’ll have a first-aid kit; but few have a big enough first-aid kit, with enough supplies, to take care of multiple serious injuries. How is it that we can think it’s right and acceptable to stockpile enough food for a year but not have enough bandages to take care of two serious injuries in that year?
The other place where most preppers are lacking is in medical training. We “hope” to find a former Army medic to be part of our survival team but don’t do anything about making sure that we can fulfill that role ourselves if we can’t find that medic or if the medic is the one to get injured. What’s going to happen to our families when they get injured, and we’re trying to treat a gash in the leg like it’s a skinned knee? Even worse, when there’s spurting blood?
In reality, every prepper should be a medic, at least to the point of being able to stop bleeding and splint broken bones. There’s no way that we can all learn all there is to learn. Special forces medical training lasts 98 weeks. That puts them at least on par with an EMT and possibly closer to a physician’s assistant than to an EMT. Even EMT training, which lasts 15 weeks in my home state, plus time practicing the skills learned, is too much time off from my work. I just can’t do it and I doubt you can either.
But that’s the level of training that we really need. Fortunately, we’ve got other options available to us, like a plethora of training videos available online. But even then, we need some idea of what to study, as well as the commitment to take the time and invest the effort to practice those skills to the point of becoming proficient in them.
Start by Building Your Kit
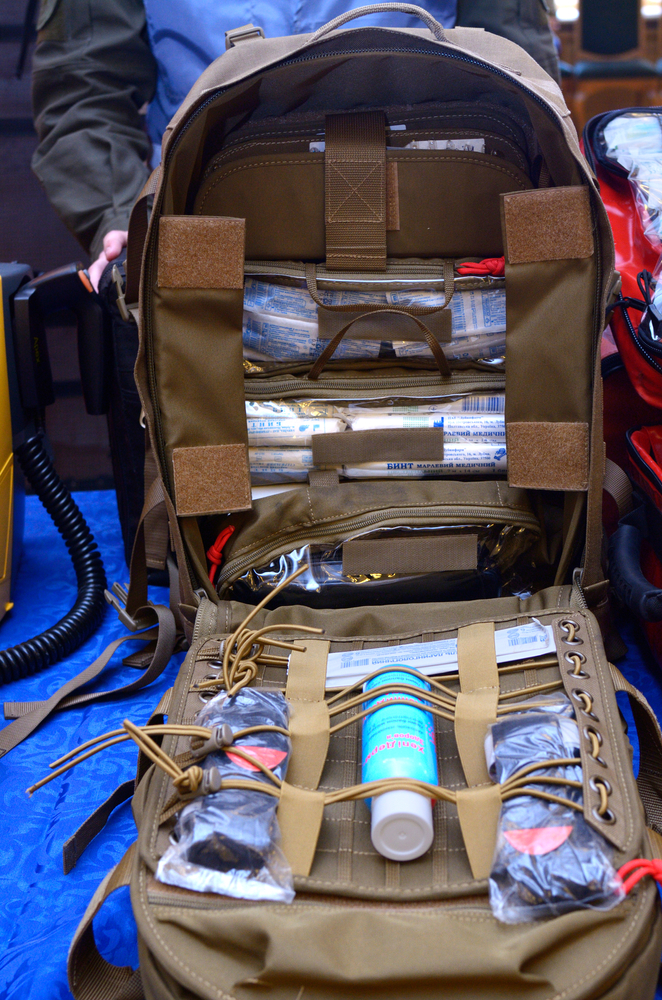
A good place to start your medical preparedness is by building a trauma first-aid kit. Trauma kits go farther than normal kits in that they provide the necessary supplies for dealing with larger injuries. If you think about treating a gunshot wound or a leg cut open by a chainsaw, your kit needs to have the necessary supplies to take care of those sorts of injuries. Not only that but to change bandages daily and to be able to treat more than one such injury.
Any trauma kit is built around being able to do two things: stop bleeding and cover a wound to keep it clean. As a secondary consideration, many also have supplies to splint a broken bone. There may be other areas covered as well, but those are the most important ones.
So, what should be in that kit? Obviously, your trauma kit needs to have an assortment of bandages (including larger-sized ones and gauze pads), antibiotic creams, and medical tape. But what are some of the things you’re likely to overlook?

- Tourniquet – a good tourniquet must be able to be tightened down to the point where it cuts off blood flow, not just slows it down. The CAT tourniquet is considered to be the best.
- Airway – something to put down the patient’s throat, either through the mouth or nose, to keep the airway open so they can breathe
- Butterfly bandages or SteriStrips – used to close open wounds, bringing the skin together so that it can heal.
- Clotting agent – used to cauterize bleeding wounds.
- Sam splint – a moldable aluminum strip with foam rubber on one side. It can be formed to be used as a universal splint.
- Irrigation bottle or syringe – for flushing debris out of a wound
- Sharp pointed tweezers – for picking debris out of a wound.
- CPR mask – provides a safer way of performing CPR
- Pressure bandage – pressure applied to a wound helps stop bleeding; therefore, a pressure bandage will help the wound to stop bleeding faster. The best is the Israeli bandage, although there are others.
- Cling wrap (for food) – a great covering for large wounds, such as abdominal wounds, to keep dirt and infection out
- Chest seal – to be placed over puncture wounds in the chest, allowing air to escape but keeping it from getting in.
- Chest decompression needle – used to release trapped air in the chest but outside the lungs
- Lidocaine – a topical pain reliever
- Medical scissors (good ones) – specially made for cutting through seams so that clothing can be removed; a normal pair of scissors isn’t strong enough for that.
- Sanitary pads – make great bandages for larger wounds – they’re sterile and designed to soak up a lot of blood while being less costly than medical-grade bandages.
Don’t take this list as being final; my intent was no more than to fill in some blanks that you might otherwise miss. I’m always looking to see what I should be adding to my own family first-aid kit, and you should too. Avoid the latest gimmick, making sure that the things you buy will actually do what they’re supposed to do.
Speaking of doing what they are supposed to do, always buy too much of any first-aid supplies you buy. Even a large first-aid kit is limited in space, and you’ll only have room for one or two of many things. You’ll want to have a box of “refills” somewhere around.
The other thing you need extras for is practice. Just watching a video on treating gunshot wounds won’t make you proficient. You should rig up a dummy that you can use and treat that dummy’s gunshot wounds over and over again, to the point where you can do it without thinking about what the next step is. Speed is often important, especially when the patient is losing blood quickly.
Using that Stuff
Let’s talk a bit about using some of those items. Please note that I am not a medical specialist, merely someone who has taken a few classes and has watched some videos online. I’d recommend doing your own studies, even seeking out some classes, so that you can become more proficient. Even so, let me get you started out. Please verify the following through other sources.
Before treating any wound, always check the patient over thoroughly. The wound that you see as obvious may not be their only wound or even the most critical. Make sure that you know what’s wrong with them, as best you can, before starting. One key thing to look for is spurting blood. That indicates an arterial bleed (bleeding artery) rather than a venous one (bleeding vein). Arteries carry blood away from the heart and are therefore under pressure. A spurting wound can cause the patient to bleed out quickly, as in five minutes or less.
Treating Basic Bleeding Wounds
Any bleeding wound needs cleaning and bandaging, even if it is just seeping blood. Cuts in the skin can offer an avenue for bacteria to get into the body and cause an infection.
- Clean the wound – Start by cleaning any debris out that might be in the wound. This starts with flushing the wound with water. Any water that is safe to drink is good enough for this step. If available, use an irrigation syringe or bottle for this. If necessary, use tweezers to remove bits of debris caught in the wound.
- Disinfect the wound – Use alcohol or hydrogen peroxide to clean out the wound after the water. Both are good at killing bacteria. Apply an antibacterial or antiseptic cream, leaving that in place while bandaging the wound.
- Stop the bleeding – In cases where the wound is spurting blood, use one of the methods mentioned below to stop the blood from spurting.
- Close the wound – If the wound is a gash or other gaping wound where the skin does not come together, it is a good idea to pull the skin together with butterfly bandages or Steri-strips.
- Bandage the wound – Cover the wound with sterile bandages to keep dirt and bacteria from getting into it. If necessary, non-sterile gauze or other fabric can be used to help soak up blood, as long as the layer up against the skin is sterile.
- Apply pressure – Pressure on the wound will help slow the bleeding and promote clotting.
Treating a Puncture Wound to the Chest
Puncture wounds to the chest, such as from a gunshot, carry a special danger in that air entering the chest cavity will prevent the lungs from inflating. Our lungs depend on the vacuum created by the diaphragm moving down and enlarging the chest cavity. But if there is a puncture wound in the chest cavity, air can get in through there and fill the chest cavity rather than filling the lungs.
The solution to this is to block off the wound from air getting into it. A chest seal is used for this. It is a flap of thin plastic or rubber that has adhesive on three sides. If one is not available, cut a piece from a plastic bag and tape it on three sides. When the patient inhales, the plastic will be sucked up against the skin, blocking the hole. But when they exhale, the chest seal can move enough to allow air to escape.
If there is already too much air in the chest cavity, it may be necessary to help that air get out. That can be done by manually holding the wound open when the patient is exhaling while closing it when they are inhaling. Another way is by using a chest decompression needle.
Using a Tourniquet
Tourniquets are one of the methods used to stop a spurting bleed in an extremity. For any tourniquet to work, it must be able to apply enough pressure to the extremity to crush the artery and block off blood flow. That’s why I recommended the CAT tourniquet; it has a windlass, allowing for tightening. There is an inherent danger in this in that it stops blood flow to the entire limb, which could result in the limb dying and the need for amputation. But the alternative is worse, as the patient could bleed out and die.
A tourniquet should always be applied as far up the limb as possible. Although the wound may appear to be several inches or more from the body, you can’t see what damage there might be inside. Trying to apply the tourniquet just above the wound might result in only stopping external bleeding, not internal bleeding.
Whenever a tourniquet is used, mark the forehead of the patient with a large letter “T.” If no pen or marker is available, use their own blood to do so. That will tell medical personnel in the emergency room to look for a tourniquet. Please note that the tourniquet will hurt, and the patient will most likely ask you to loosen it. Don’t do that, as it could allow them to bleed out.
Packing a Wound
Another option, if a tourniquet is not available, is to pack the wound. This works especially well for puncture wounds, like gunshot wounds, where there is a clean hole to work with. The idea is to push enough gauze into the wound that it crushes the artery up against the bone, stopping the bleeding. Many people don’t like this technique because it requires sticking a finger into the wound. Nevertheless, there are times when it might be necessary.
Packing a wound requires gauze in a roll. Pull loose the end of the roll and wrap it around the tip of the index finger. Then use that finger to press the gauze down into the wound, getting it as far in as possible. Then pull the finger out, leaving the gauze in place. Continue pushing more gauze into that hole until the blood stops flowing.
Please note that this method will also be painful for the patient. You may very well need someone to hold them down while doing it.
Using Blood Clotting Agents
Blood clotting agents are our third method for stopping spurting blood. They work by creating heat which can cauterize the bleeding artery. This means that the clotting agent has to be put down into the wound to function. It also means that pressure must be applied while the clotting agent is doing its thing. Yes, that means sticking a finger in the wound, once again.
The other yes is that it will hurt like crazy, so, once again, it will probably be necessary for someone to hold the patient down while the cauterization is happening.
Splinting a Broken Bone
Dealing with bones is a bit different than dealing with wounds unless it is an open fracture, where the broken end of the bone is sticking out through the skin. In that case, there’s a need to clean the wound, splint the bone, and bandage the wound to keep it clean.
In a severe emergency, where there is no possibility of getting the patient medical help, it may be necessary to set the bone. The big problem there is that none of us are competent in doing that. Your best bet is to try pulling the limb straight so that the bone can slide back into place. You should be able to feel if it is in place through the flesh. However, I wouldn’t recommend that if it is possible to get the patient to a doctor.
Before transporting the patient, it will be necessary to splint the bone in order to keep it from moving. This means not only splinting the part that is broken, but the joints above and below the break as well, so that those joints can’t move. If either joint moves at all, it will move the bone, possibly causing the broken ends to rub against each other.
Just about anything straight and stiff can be used for splints, such as sticks, but one of the best options is the Sam Splint mentioned in the list above. The splinting material can be cut with medical scissors and formed right on the limb. But to reduce the pain inflicted on the patient, it is best to form it on the opposite (uninjured) limb, then transfer it over onto the broken one. Once in place, it can be held there with elastic bandages.


