Disclaimer
Before we get started, let it be known that any trapping of live animals outside the rules and regulations outlined by local laws is illegal and can result in heavy fines or worse. Traps are dangerous, and every caution must be taken to avoid injury to yourself or others. All traps discussed in this article are for instructional purposes only.
Coop Traps
Once basic skills are practiced (see Part I and Part II of this series), the only limit to trap making becomes one’s own imagination. Using a deadfall with a specialized perch trigger for trapping birds is a perfect example of this. The main component, as the name implies, is the coop, or cage that will keep the bird from escaping once the trap has been sprung.
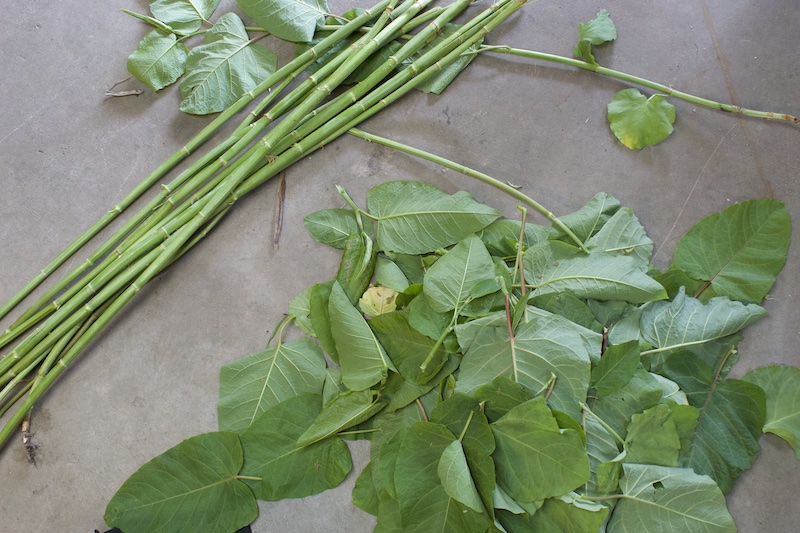
Step one is to find a pile of sticks, and it is important that they be as straight as possible. Aspen saplings, small spruce boughs, or in this case, invasive bamboo, are all great candidates for the bars of the cage. Straightness is important, because any irregular gaps between the sticks is a potential escape route. The diameter of the sticks will play a role in how large of a bird you can catch. Coop traps with large diameter sticks may work well to contain a mourning dove, but a boreal chickadee may be able to escape without much effort. However, much like everything else in nature, there are trade offs. Using smaller diameter sticks may work well for containing smaller birds, but the coop itself will weigh much less, requiring a more sensitive and fragile trigger. Based on personal experience building coop traps, typically heavier traps geared for medium sized birds is an easier way to start learning.
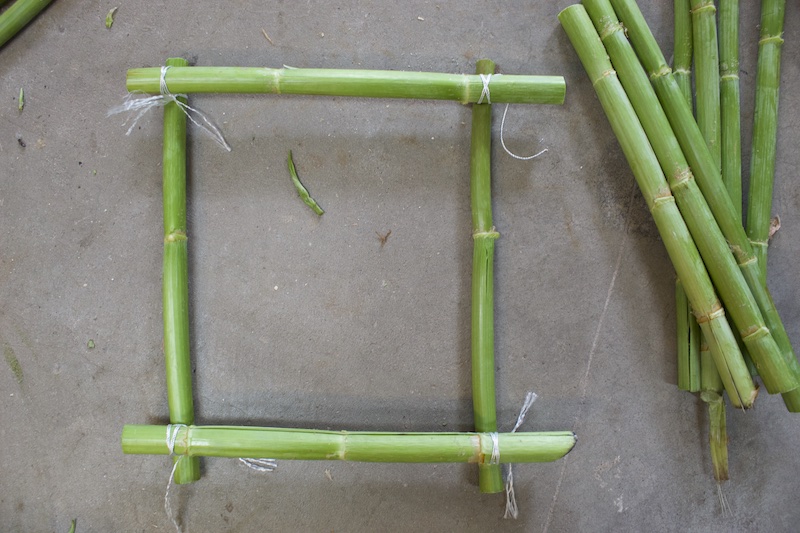
Start by processing the sticks that will be used for the bars of the cage. Wild bamboo is easy to work with, and can be cut with a large blade or pruning shears. Imagine how large your target bird will be, and cut the first four sticks which will be used as the base, long enough to comfortably enclose the bird. Using some type of cordage, secure the base together with a square-lashing technique. This article does not go into the details of lashing, but there are numerous tutorials out there, and learning lashing is an invaluable skill with a multitude of applications.
After the base is secure, continue adding sticks and lashing them together, similar to building a log cabin, until the cage is formed in its entirety. If you have large fingers like myself, you will find that it is easier to lash larger sticks, and may find smaller sticks a bit frustrating. That being said, with patience, it can be done. As the layers are added, the cage will form a pyramid structure, because it is easier to lash the new sticks to the bottom layers if they are slightly offset. Extra care may need to be taken with cordage such as fishing line, or the inner strands of parachute cord due their polymer composition causing knots and lashings to slip loose. By working slowly, and ensuring each lashing is tight before moving to the next, one may avoid the frustration of watching the bottom layers unravel and fall.
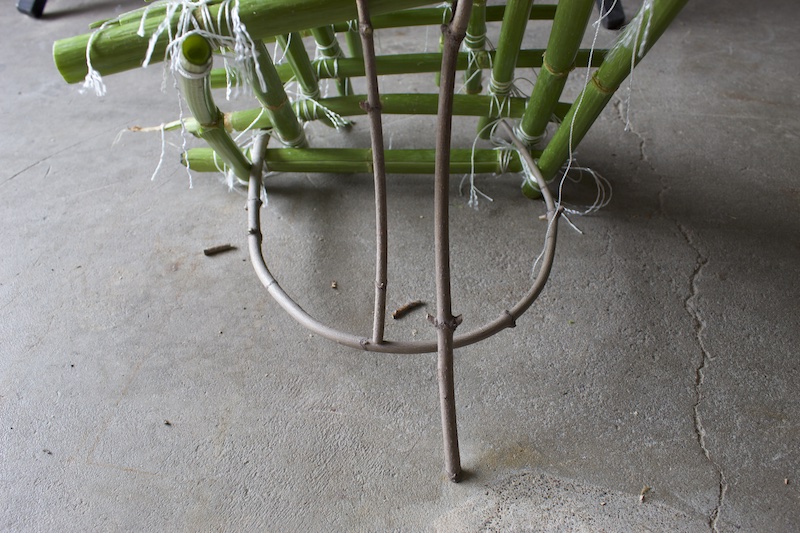
Trigger mechanisms for coop traps are different from the figure four we used for spring snares and simple deadfalls, and are specifically designed to take advantage of a bird’s instinct to perch. First find a thin, green stick or sapling long enough to bend into a “U” shape without breaking. Once bent, it should be just large enough to fill out the inside of the base. The ends of “U” are placed into two corners of the base of the cage. These ends can be secured with cordage, small pins, or if set properly, may not need to be secured at all. It may take some experiment to figure out what will work best for the cage being used. For this cage, I was able to use the tension of the “U” to hold it in place. As the trigger is being set, the “U” should be suspended about an inch off the ground. Photos used in this article were taken on a concrete surface for clarity; however, this type of trap would normally be placed on a relatively flat surface where a bird is likely to notice any bait placed inside.
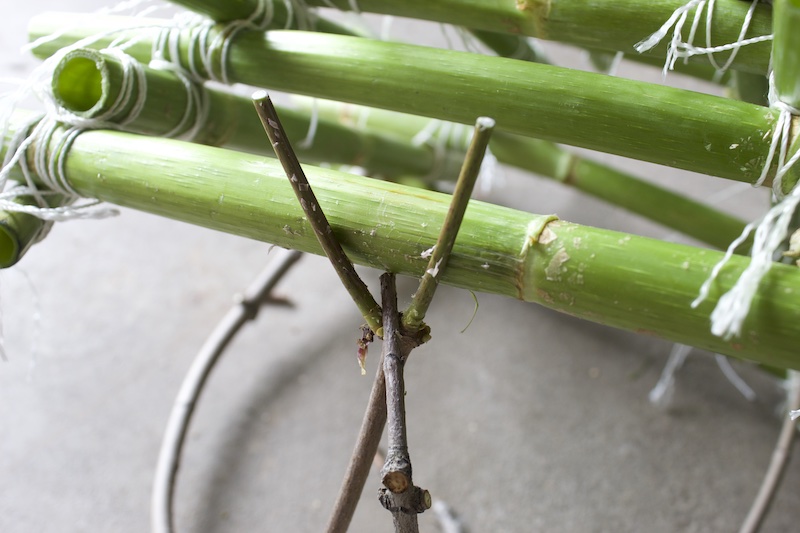
To spring the trap, a twig with a small, hockey-stick shaped bend on the end is carefully rested on the suspended “U” perch. A second twig with a forked end is placed on the ground. By resting the hockey-stick bend in between the fork, and carefully leaning the raised edge of the cage against it, friction is created which holds the trap in the air. Spread some seeds, grubs, or bait of your choice on the inside of the “U” shaped perch. When a hungry bird comes for the bait, it will naturally attempt to perch, the weight of it landing on the suspended ”U” will cause the hockey-stick shaped twig to come loose and the cage will fall.
Fish Traps
Fish are most likely the best source of vital nutrients in a survival or emergency situation. They are loaded with energy stored in fats, protein to prevent muscle loss, and humans have been catching fish since prehistoric times. Although their benefits are numerous, it may not be possible to spend all day fishing with a line and lure. Some of the oldest fish traps are weighted funnels woven from flexible branches. In modern times, gill nets have been employed to efficiently catch large numbers of fish as they swim by. But chances are, if thrust into a survival situation, the opportunity to think of packing a net, cordage, or spend the time weaving funnels may not present itself. This is where using the natural flow of water currents can be manipulated into acquiring life saving nutrients.
To make this type of trap work, the fish will need to be directed to a location in which they have a difficult time getting out. There is no “right” way to do this, but the rule of thumb should be using nature to make life easier. When scouting for a location to build this trap, I found a section of the river where waterlogged deadfall was already creating a barrier that I could use to potentially influence fish behavior. Boughs from black spruce lining the shore, and an abundance of river rocks did the rest. Without the use of a net or funnel, the fish can be directed into a narrow spiral close to the shore, making it easy for you to grab or spear them.
Similar to the other traps covered thus far throughout this series, the spacing between the items directing the fish will also determine how large of a fish you can trap. The tradeoff here is, the closer the spacing of items, the harder the current will push against them. This means if smaller fish are the target, the barrier will need to be more firmly in place, or the buildup of water pressure will wash away your efforts. Finding a river with gentle flow is preferred to one with a strong current. Even water that is moving lethargically will build up strong pressure if you try to impede its flow. This section of the river was narrow enough that I could emplace obstructions across its entirety with few issues. But the same concept can be used on wider areas, understanding that if the barrier can not cross completely, there is a risk of fish avoiding it. Multiple directional fish traps can be set up along several points to increase the chances of a successful catch.
It’s important to remember, that just like the trapping of mammals, trapping fish is often prohibited by local regulations. There are special circumstances where trapping fish is allowed, but if you are going to practice setting it up, make sure that it is fully deconstructed before leaving it unattended. This will keep everyone out of trouble, and prevent a fish from being trapped when no one is around to do anything about it.
Recap
By using one of the most fundamental forces of nature, gravity, we can manipulate our surroundings into doing most of the work. Deadfalls, using the potential energy of gravity, can be modified in numerous ways to trap anything that travels the land, or soars through the sky. The flow of water has been used to saw timber, grind flour, and power cities of millions. Using it to catch food can be a simple feat, comparatively. Please share your experience trapping birds or fish! What method was the most effective?

